
今回は番外編として、地方でもTokyo FMを楽しむ方法を紹介したいと思います。
最近では、ワーケーションというスタイルが始まっているみたいです。「ワーク」(労働)と「バケーション」(休暇)を組み合わせた造語で、観光地やリゾート地でテレワーク(リモートワーク)を活用しながら、働きながら休暇をとるらしいです。(追記:2023年8月ではそういったワードは死語になっているようです。)
そのなかには、どこでもおなじみの番組を聴きたい方もきっといるでしょう。
そこで、radiko(ラジコ)を使って、有料/無料でエリア外のラジオ局を聴く方法を紹介したいと思います。
有料編:月額350円
プレミアム会員になると、通常のラジコ(無料・放送エリア内聴取)とは異なり、日本全国のラジオ局が聴くことができます。
お手軽に放送エリア外のラジオが聴けますが、月額350円(税別)も払いたくない方は次の方法を試してみてください。
無料編(その1):Proxyサーバ
radikoでは、IPアドレスでエリア判定を実施し、お住まいの放送エリアのラジオが聴けるように設定されています。
そこで、Proxyサーバを本宅に設置し、別宅や観光地でもTokyo FMを聴けるように設定してみましょう。
プロキシ(Proxy)は英語で「代理」です。
アクセス元のコンピューターの身元を隠すためにプロキシサーバーを利用する場合もあるが、ここでは首都圏にある自宅にProxyサーバを設定して、そこを経由してみます。
squidのインストールと設定
ここでは、Proxyサーバに無料のsquidを利用してみます。
Fedora32では、次のようにインストールし、サービスを有効にしてください。
# yum install squid
# systemctl start squid
# systemctl enable squid
また、ファイアウォールの3128 ポートを空けてください。
# firewall-cmd --permanent --add-port=3128/tcp
# firewall-cmd --reload
御自身の環境にもよりますが、必要に応じて自宅のルータに静的NATを設定しましょう。
これはLAN の外部から常に同一の IP アドレスを指定することによって内部サーバにアクセスすることができるので、Proxyサーバにアクセスできるようになります。
特定のIPアドレスの許可
別宅や観光地で、自分のIPアドレスを確認し、squid.confを更新し、サービスを更新しましょう。
以下にサンプルを掲載したので、myproviderのところをアップデートしてください。
$ sudo cat squid.conf
#
# Recommended minimum configuration:
#

# Example rule allowing access from your local networks.
# Adapt to list your (internal) IP networks from where browsing
# should be allowed
acl localnet src 0.0.0.1-0.255.255.255	# RFC 1122 "this" network (LAN)
acl localnet src 10.0.0.0/8		# RFC 1918 local private network (LAN)
acl localnet src 100.64.0.0/10		# RFC 6598 shared address space (CGN)
acl localnet src 169.254.0.0/16 	# RFC 3927 link-local (directly plugged) machines
acl localnet src 172.16.0.0/12		# RFC 1918 local private network (LAN)
acl localnet src 192.168.0.0/16		# RFC 1918 local private network (LAN)
acl localnet src fc00::/7       	# RFC 4193 local private network range
acl localnet src fe80::/10      	# RFC 4291 link-local (directly plugged) machines

# Please add your public IP addresses
acl myprovider src xx.xx.xx.0/24
acl myprovider2 src yy.yy.yy.0/24

acl SSL_ports port 443
acl Safe_ports port 80		# http
acl Safe_ports port 21		# ftp
acl Safe_ports port 443		# https
acl Safe_ports port 70		# gopher
acl Safe_ports port 210		# wais
acl Safe_ports port 1025-65535	# unregistered ports
acl Safe_ports port 280		# http-mgmt
acl Safe_ports port 488		# gss-http
acl Safe_ports port 591		# filemaker
acl Safe_ports port 777		# multiling http
acl CONNECT method CONNECT

#
# Recommended minimum Access Permission configuration:
#
# Deny requests to certain unsafe ports
http_access deny !Safe_ports

# Deny CONNECT to other than secure SSL ports
http_access deny CONNECT !SSL_ports

# Only allow cachemgr access from localhost
http_access allow localhost manager
http_access deny manager

# We strongly recommend the following be uncommented to protect innocent
# web applications running on the proxy server who think the only
# one who can access services on "localhost" is a local user
#http_access deny to_localhost

#
# INSERT YOUR OWN RULE(S) HERE TO ALLOW ACCESS FROM YOUR CLIENTS
#

# Example rule allowing access from your local networks.
# Adapt localnet in the ACL section to list your (internal) IP networks
# from where browsing should be allowed
http_access allow localnet
http_access allow localhost

# Please add your lists
http_access allow myprovider
http_access allow myprovider2


# And finally deny all other access to this proxy
http_access deny all

# Squid normally listens to port 3128
http_port 3128

# Uncomment and adjust the following to add a disk cache directory.
#cache_dir ufs /var/spool/squid 100 16 256

# Leave coredumps in the first cache dir
coredump_dir /var/spool/squid

#
# Add any of your own refresh_pattern entries above these.
#
refresh_pattern ^ftp:		1440	20%	10080
refresh_pattern ^gopher:	1440	0%	1440
refresh_pattern -i (/cgi-bin/|\?) 0	0%	0
refresh_pattern .		0	20%	4320
変更が終わったら、設定ファイルをリロードしてください。
# systemctl reload squid.service
もし、許可するIPアドレスを追加しないと、次のようなエラーが発生します。
xx.xx.xx.xx TCP_DENIED/403 3919 CONNECT www.some_host.com:443 - HIER_NONE/- text/html
Firefoxの設定
ここでは、ブラウザとしてFirefoxを利用します。
「編集」-> 「設定」をクリックし、ネットワーク設定の「接続設定」をクリックしてください。
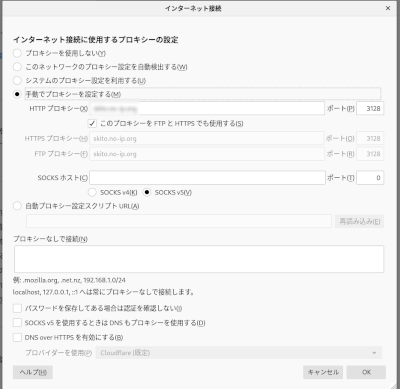
HTTPプロシキーにsquidのURLを入力し、設定は完了します。
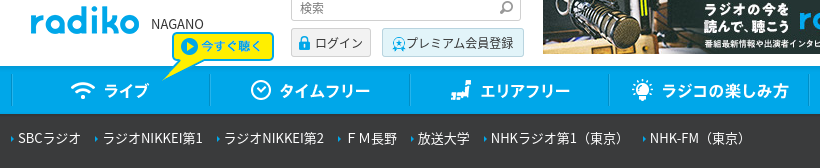
するとこのように、Tokyo FMを含む多くのラジオ局が表示されます。
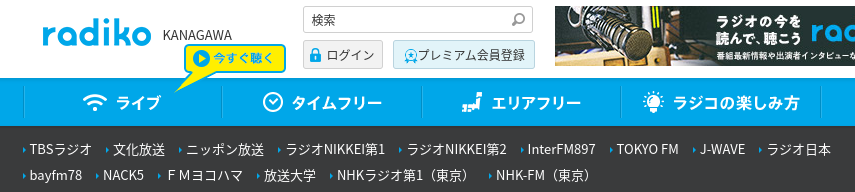
あとは、通常どおり、選局し、再生するだけです。
ちなみに、静岡や長野ではラジオ局がぐっと少ないです。

無料編(その2):Chrome 拡張機能
ウィンドウから拡張機能を選んで、chromeウェブストアを開きます。Rajikoを検索し、インストールするだけで、地方や海外からも東京の番組を聞くことができます。
パソコンのChromeの拡張機能のRajikoをインストールするとradiko.jpのジオロケーション制限を解除することができます。

またRajikoのアイコンをクリックして、エリアを変更することもできます。

まとめ
radikoでは、エリア判定を実施しているので、今いるエリア外のラジオ局を選択するには、プレミアム会員登録、Proxyサーバの経由、またはChromの拡張機能のrajikoを利用してみてください。

コメント